Sunday, February 24, 2013

Saturday Night Drive-In

Alex is getting old enough where he can enjoy snippets of movies at a time. As a huge Disney fan myself, being able to experience them with Alex for the first time has been very exciting.

Here is Alex before we found Nemo...


Tonight we decided to watch Cars. We thought would be fun if it we allowed Alex to have his own drive-in movie...


He had more fun than we thought he would.

He'd watch a little.


He'd drive a little.


He'd watch a little.


As with any car...

He did have some engine trouble..


And... he did have a little road rage.


But..

He got a lap around the track with Lightening McQueen.


When the movie head over, he was pretty disappointed.


The only problem?

He didn't want to go to bed..


This 18 month old made it through the entire movie.  It was a fun night.  Have a drive-in movie in your living room.  Add some entertainment to movie night.


Wednesday, February 13, 2013

Sick again..

For the second year in a row I'm gonna be sick on Valentine's Day. It's a crappy feeling when you give up and don't care about a holiday you love. As I'm sitting here in my pjs, at almost 11am, I'm comforted to know.. My son is too.

At least I have a buddy to find Nemo with.. again.


Monday, February 11, 2013

Baby Jar Christmas Gifts


Jar after jar of baby food was being consumed by our little one.  They are such cute little jars and I hate the thought of recycling them without coming up with a way to use them. 


The Hot Cocoa Reindeer and Marshmallow Snowman were born.

Supplies:

An even number of baby jars
razor blade
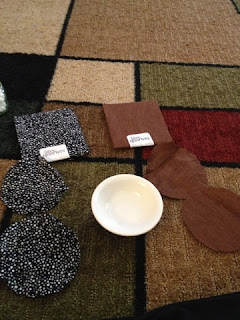
fabric for reindeer head
fabric for snowman head
ramekin to trace
rubber bands
brown pip cleaners
silver cord
black, red, orange paint pens
mini marshmellows
hot cocoa

Use the razor blade to get the glue off the baby jars.


Use a ramekin to trace the size hat you need for both reindeer and snowman.  Experiment til you find something the right size.


Use a rubber band to secure the brown fabric to the baby jar.


Use the paint pens to draw on the face.

Over the rubber band, twist the pipe cleaner in the back.


Cut smaller pieces of pip cleaner to create the antlers.


For the snowman.... secure the fabric with a rubber band and cover rubber band with silver cord.


And draw the face on.

and Voila....


They can also be created on larger jars as well....


I gave these little guys with a bag of cookies.  Who doesn't like Hot Cocoa and Cookies around the holidays??


Homemade Valentine's Day Cards


I got inspired to make homemade Valentine's Day cards.  I figure my little man won't be little forever.  I want to paint up that hand and print it on as many things as possible!!  Making homemade cards is great, but my dilemma was:  How do I have a big enough envelopes to mail them? 

I went to the Joanne's to pick up items for my Valentine's, but I noticed they didn't have envelopes I could use.  I went to CVS.  They have a whole stationary section. But, besides the normal mailing envelopes, they only had the large ones.  Not interested.  Went to a UPS store.  No luck.

So I went on Pinterest.  I was convinced I could find one.  And I did!  It told me to take apart a greeting card envelope to use as my template.  I could make my envelopes out of anything!  The only problem?  The unfolded envelope was way bigger than my cardstock.

So... I created my own.

I started by cutting my cardstock to a 8"x8".

Then I marked halfway down each side.  At the 4" mark.


Then I used a ruler to draw lines between each mark.


And folded each side along that line


Then I reversed the folds, so the ink marks would be on the inside of the envelope.

and Voila!


I used the 8"x8" cardstock to trace, so I could sped up the process and make many of them.

Once I had an envelope, I needed to figure out the size of the card.

The Valentine's Day cards were 5"x10".  So when folded they would be a 5"x5" square.


Once I cut it out, I traced to make the others.

Here is the cover of the card.  Took thumb prints, cut them out, and added stickers.


And the inside.


I took a hand print (minus the thumb) for the bunny.  I did my best to keep his fingers together in sets of two for the ears, but he's 18 months, it's not that easy.  Added the eyes and added more stickers.


And that's it!

I did mail these cards.  I attached stickers to hold the folds of the envelope together.  I am not positive that worked??  I put a sticker on each fold.  Unfortunately we mailed them before I got a picture... I will find out.  I may adjust the measurements for future experiments


This one's for Daddy....


Not as many stickers because it's not getting mailed.

Happy Valentine's Day!


Liquified Super Mom Brownie Points

Was having a wonderful day.  I got the greatest compliment from a child this morning.  She said my dance class is "the reason I look forward to Mondays".  N-O-B-O-D-Y likes Mondays!!!  I was on cloud nine.

This cheery chipmunk went to McDonalds. I might as well have been singing through the drive thru as I got my coffee.  All my classes went well today. I went grocery shopping and came home.  I decided to make some chicken noodle soup because my hubby picked up an amazing rosemary olive oil loaf over the weekend and the soup sounded perfect.

I start prepping my ingredients when I remembered a pin I saw on pinterest for heart-shaped carrots.

Carving my little hearts, excitedly waiting for my hubby and son to come home, feeling like I'm earning Super Mom Brownie Points.  How can I not... with carrot hearts???

When my husband calls.

It hit me.

I pick up the phone and say, "Was I suppose to pick up Alex?!?" Our 18 month old son from daycare.

His answer was, "Yes, of course!  Did you forget?!?"

"I'm going right now!!"

My Super Mom Brownie Points started melting away as I'm grabbing my purse to run out the door.  I'm 45 minutes late to pick up my son.

Guess I can't win them all.

Picked up my son who was in good spirits.  (He's too young to realize his mom forgot him.)

Get home and finished making my chicken noodle soup.

And there they are.


The little tokens that were going to give me my Super Mom Brownie Points today.

Oh well.

At least my son liked the soup.


Thursday, February 7, 2013

6 Months Of Blogging...

February marks is the 6 month anniversary of my blog.  I'm not a great writer by any means, it wasn't my best subject in school, I wasn't quite sure what I was going to get out this blog, but it has surprised me.

I started "A Mom's Pursuit of Happiness" with my first posting on September 10, 2012 with the original posting A Mama's Pursuit of Happiness.  I started this blog because I was told by so many people "enjoy every moment" and to be honest I had a hard time adjusting to my new role as a parent.  That didn't change until Alex turned 13 months.  I thought I was going to be one of those mothers where motherhood would come easily.  I love kids.  But it was a hard transition for me emotionally and physically.  It was a drastic change in life and it took me a full year to heal from childbirth, which made it difficult for me to fully embrace.  I found that blogging has helped me focus on the amazing aspects of being a parent and it carried me through the hard ones.  Now?  I can't get enough of Alex.  My heart aches to be away from him.  Now my job isn't to be a servant to a baby, now I'm a Mom to an amazing little boy. 

Since I started this blog, 1577 have viewed my blog.  

1414 in the United States
39 in Russia
35 in Germany
20 in New Zealand (thank you kiwi friends and family)
14 Sweden
12 South Korea
9 Malaysia
8 United Kingdom
4 in France
3 in Canada

I was really excited when my post The Truth About Pregnancy by passed my original post with 80 views, but then my post Miracles in Baby Sign Language by passed that with 85 views.  I think it may have been posted on a Sign Language blog because it happened overnight.

But, the purpose of this post, is to thank my friends and family who have LIKEd my postings, or told me positive comments about my blog.  I really appreciate it.  This blog gets me excited to do new things and actually do my pins on pinterest.  I think this blog makes me a better mother and your positive feedback helps fuel my fire.

So thank you and keep it coming.


Wednesday, February 6, 2013

Touchdown Dip

It's Super Bowl time.  I got really excited about some of the things I'd seen on Pinterest and wanted to make something super awesome.

I wanted the "Wow Factor" if you will, and was super excited when I stumbled across

THE.... SNACK.... STADIUM.....!!!!

Here is my version of the 7 layered dip behemoth :

My Step-Dad holds a massive Super Bowl party every year with 40 people and 5 tvs, so I wanted to bring excitement to the potluck.  There was quite a spread.


But the real test is how long the dip lasts....

The dip was gone by half time!!! (Yahoo!!)

What my unsuspecting friends didn't know was...

The Ingredients:

A Can of Fat-Free Refried beans
Can of Drained Diced Black Olives
A Jar of Salsa (I used Pace)
Cheddar Cheese
Fat-Free Plain Greek Yogurt
1/2 to a Whole Diced Onion
4 Large Ripe Avocados
Garlic Salt
Tooth Picks
9 packages of Snack Sized Slim Jims
Red Grape Tomatoes
Yellow Grape Tomatoes  
Tortilla Chips 
Piping Bag (I used a ziploc with a 5 icing tip.  A snip at the bottom of the ziploc will work, but the lines won't be as clean.  I also assume a squeeze bottle should work?  So however you'd like to try it.)

So the dip was a healthier version of the 7 layer dip.  I didn't tell anyone until after they told me they liked it.  ::wink::

The Order of Layering:

Day before:

Layer in a large casserole dish: 
A Can of Fat-Free Refried beans
Diced Black Olives
A Jar of Salsa (I used Pace)
Cheddar CheeseFat-Free Plain Greek Yogurt

Day Of Super Bowl Party Smack Down:

Make Goal Posts 
Put the toothpick through the Slim Jim.


Attach sides and cut toothpick for the post.


Take the longer slim jim and put a toothpick through it to attach the smaller slim jims to make and X.


The goal post on the left had a harder time standing because the bottoms were too short.  I made the one on the right with longer Slim Jims.  Both goal posts survived the party and the car ride to the party.


Press goal posts into layers where you want them.
Make guacamole by mixing 4 large avocados with garlic salt.
Lay guacamole around goal posts.

(This is where I learned I should put the goal posts in first before adding guacamole.  Then I learned the greek yogurt should be under guacamole because the red was too hard to cover, but adjustments have been made to the recipe, so you won't have that problem)

I cut my ziploc to take the 5 icing tip and put greek yogurt in the bag.  I piped the greek yogurt by hand.  The slower you go, the easier it is to make the lines straight, but it doesn't have to be perfect.


Put the tomato players on.

And...  Voila!!


Here are some of the stadiums I looked at for inspiration:

This quacamole dip is where I got the lines and the players....


These two stadiums is where I got the ideas for the goal posts....  They are really Bad A*$... but I don't love the people at my potluck enough to invest that kinda dough....


I hope you enjoyed my adventures in Snack Stadium.  Try it out.  I hope it inspires you to have fun and create your own twist!

Happy Super Bowl!!